GoogleTest Demo
Project stats
- Difficulty: medium 3/5
- Cost: 0€
- Time: ~2h
Motivation
It is nice to have a powerful unit test framework at hand when developing more complex projects, possibly saving a major amount of time debugging (especially on-Target debugging in the embedded world can be really time-consuming), improving code quality and possibly boosting insights to APIs and architecture for others.
The embedded world
Traditionally, microcontrollers were limited on the memory side. In the past, they neither had much RAM nor PROGMEM so the code I wrote was mostly in lean C, and configuration took place in lists of #define that wouldn’t weigh much because the preprocessor would do the work; not the µC at runtime.
My unit tests were alyways bound to the hardware they were running on - take Unity as a well-known example - but now I wanted to try something new:
Write Object-oriented style code, and get the business logic tested independently of the hardware. I selected the GoogleTest framework and I wanted a seamless integration into my workflow with VScode and its extension PlatformIO.
Until recently, the only way to do this was to run GoogleTest in parallel using the GNU Compiler Collection and have it controlled by PlatformIO. Recently, however, GoogleTest can be used directly as a PlatformIO Library. Therefore, I’ll cover both options here.
Using GoogleTest directly in PlatformIO
The installation is particularly easy here:
- Clone my Github repository PlatformIO-gTestgMock.
- Open a console window in the repository folder and switch to the corresponding branch using
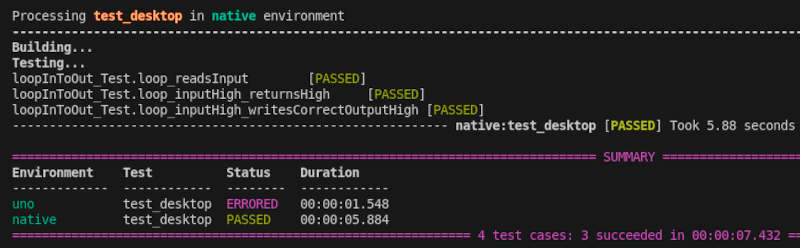
git checkout googletest-native. - Follow the instructions in the repository’s README file and test the setup.
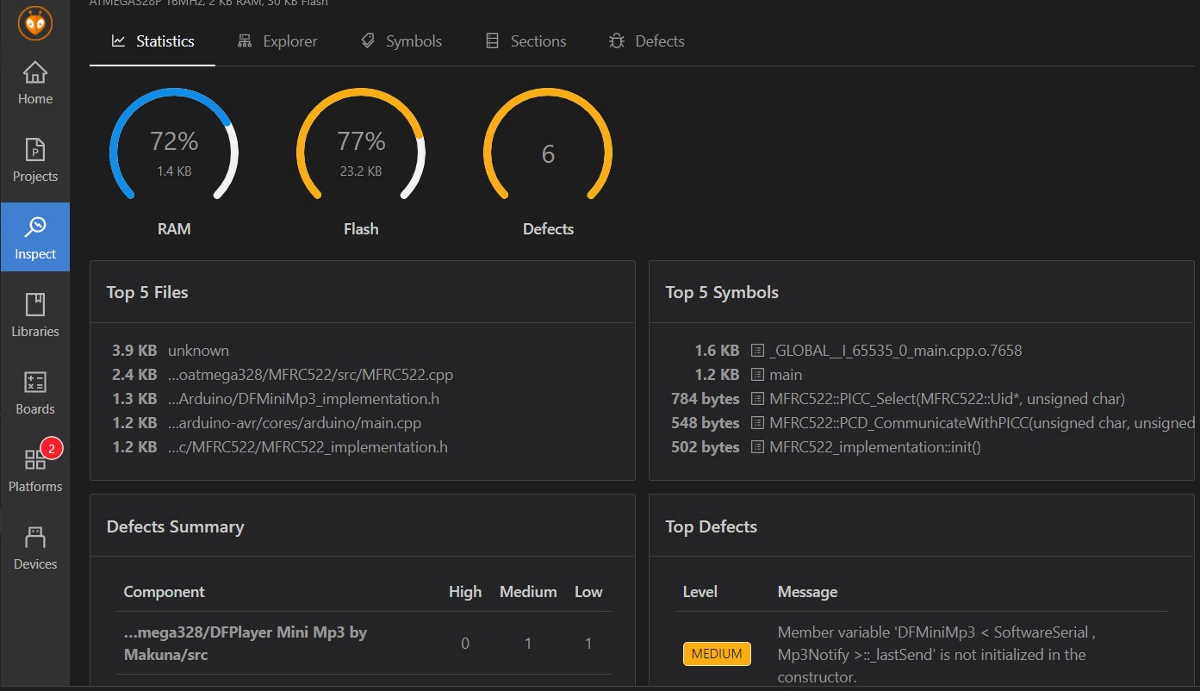
This is what it looks like when the tests have been successfully run:
Using GoogleTest with GCC
You can install the required software yourself (even on a Windows1 computer) to get started with GoogleTest.
Download and install MinGW
See this thread in the PlatformIO forum if you have any questions about the following steps.
- Unix users: Skip the steps up to this point, as you probably only need the
libpthreadgclibraries. Check for the presence of all libraries (but omit themingw32-prefix) and install any missing ones. Make sure thePATHvariable is set correctly. - Windows users:
- Download MinGW, e.g., from Sourceforge
- Install by running
mingw-get-setup.exe. If you like graphical user interfaces, leave the corresponding box checked. I do not recommend changing the installation directory. If you do, you’ll need to remember the new path.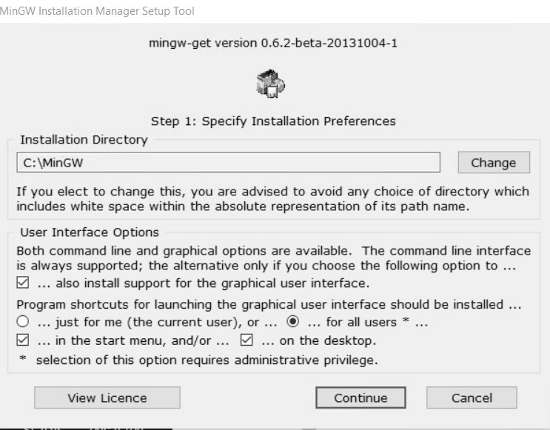
Configure MinGW
- For GoogleTest to run, you’ll require additional packages to be installed:
mingw32-gcc-g++(of course!)mingw32-libmingwexmingw32-libmingwex-dllmingw32-libmingwex-devmingw32-libpthreadgc-dllmingw32-libpthreadgc-dev
- To install these,
- If you use the GUI: search libraries under “MinGW Standard Libraries”, add/activate/install them one by one.
- Command Line Interpreter users: type
mingw-get installand then add the package name. Easy. If you get an error message saying that some of those do already exist, that’s good for you!
- Now you need to add MinGW’s
\binfolder to your system path variables so PlatformIO can find them later. If you didn’t hand-modify it, it should beC:\MinGW\bin.- GUI fans: follow this guide
- CLI: type
set PATH=%PATH%;C:\MinGW\bin, check if it worked withecho %PATH:;=&echo.%.
Congratulations! You have installed MinGW, set its environment variables to be found more easily by third party applications, and configured it to work with GoogleTest.
Configure PlatformIO
- After setting the
PATHvariable, you’ll have to restart VScode. - To make PlatformIO correctly link to the compiler you just install, make it use the
nativeenvironment where your compiler sits. Open a PlatformIO terminal within one of your projects and typepio platform install native
- Two choices:
- Follow through this tutorial and use my example project as described below. You can safely skip the upcoming section as that project comes pre-configured and is open for your modifications as you have basic hardware abstraction interfaces at the ready right from the start.
- Take your own project and modify its
Platformio.iniso that GoogleTest can be run.
- This what you should add to your
Platformio.ini:[env:desktop] platform = native build_flags = -std=gnu++11 # use installed GNU C++11 compiler. -pthread # found in gtest documentation lib_deps = googletest # Will automatically load latest googletest lib lib_ignore = src # most main.cpp's directly access the hardware. # Can be removed if your project is different. # # PLUS: Any files that contain bare-metal hardware commands # (e.g. digitalWrite), g++ won't have the headers or specialized compiler knowledge! lib_compat_mode = off # Must-have for external stuff like gtest!For the environment
desktop(= your computer without target), it uses thenativecompiler which is GCC/G++ that you installed and set thePATHfor. GoogleTest uses C++11 standard and threading which you have to add to the build flags. Of course, the build depends on thegoogletestlibrary and you want to ignore all files/folders that contain source or header files using hardware-related commands or headers. Library compatibility mode has to be switched off for the Library Dependency Finder to includegoogletest. - (Optional) In case you like using GUI buttons better than typing a line into your console to start the tests, create a custom configuration.
Running Tests
For a quicker start, you can clone my example repository (on branch main). It contains all the necessary elements to test whether gTest and gMock are working correctly. This allows you to immediately verify whether the installation was successful.
- Unzip the zip file or use SSH to clone the repository.
- Open the PlatformIO extension home page, click “Open Project,” and select the folder.
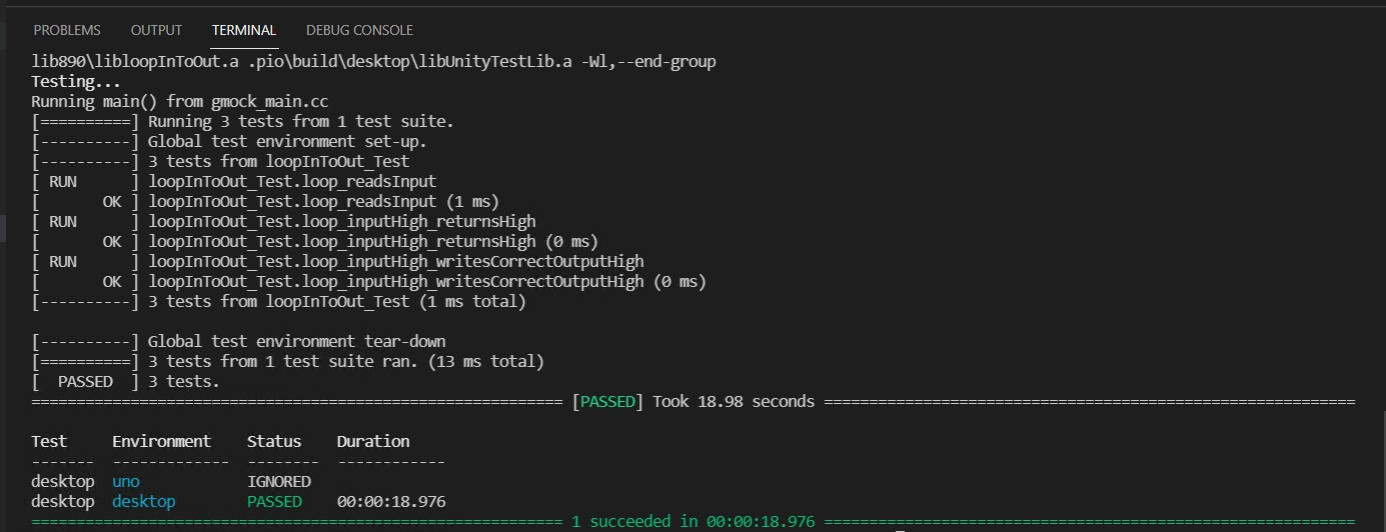
- To run the unit tests, open a PlatformIO terminal and enter
pio test -vvv -e desktop -f test_desktop(-vvv = verbose -e = environment, -f = filter). The parameters are required because the tests can only be run on the desktop environment, not on the microcontroller. - After a while, the message shown below should appear.
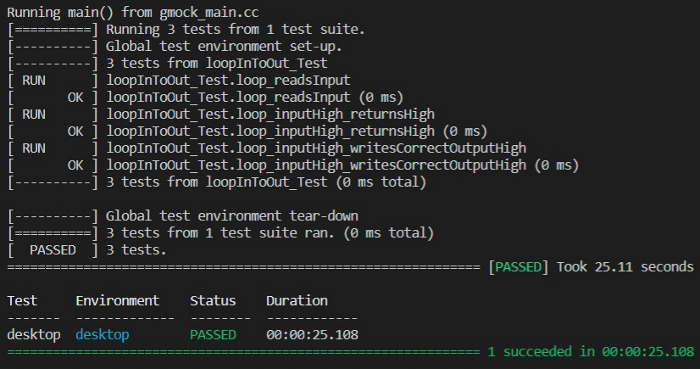
Great! Unit tests within PlatformIO have been built and executed!
Tips and Tricks
Note that your PlatformIO_gTestgMock/.pio/build/desktop folder now contains an executable called program.exe. If you run this from the CLI of your choice, you should see the same result as in the above image. You might want to choose this option more frequently once you have more tests that not only fail but crash the program on execution, and to debug tests (and not the user code), as PlatformIO’s CLI tends to hang or miss out the reason for why the test crashed. You might also want to have the stack trace printed in these cases although this would really go far beyond scope of this exercise.
From here,
- you might want to continue reading below for a deeper understanding of the repository contents and how GoogleTest works
- you could go practice writing tests by adding more cases, e.g. to verify if the
LOWstate is looped through correctly - You could also enhance the interface of these groundworks, e.g. by adding the
analogRead()function to the hardware abstraction layer - You could write your project logic on top of this, cleanly cut out the hardware dependencies, and enjoy the ability for easy porting of your project to different hardware devices and manufacturers
- Or do this other brilliant stuff that you were up to before you were diverted by this tutorial.
Repository contents explained
The following sections cover most of the files in the repository and explain what they do in detail. The implemented business logic is minimal and should be seen as example code - to create the least confusion possible when dealing with this complex matter. For a real-life project that uses all of the patterns illustrated on this page, please refer to my Tonuino page.
Hardware abstraction layer interface
Let’s have a look at the bespoke interface and how it’s structured.
// hal_if.h
namespace hardwareAbstraction {

// Hardware Abstraction Layer Interface class
class Hal_IF
{
public:
    virtual ~Hal_IF() = default;

    virtual bool digitalRead(uint8_t pinId) const = 0;
    virtual void digitalWrite(uint8_t pinId, bool value) const = 0;
};

} // hardwareAbstraction
The Hal_IF class has two methods which are both virtual. This means that a client class using this interface can call the method, and is thus “auto-forwarded” to the concrete implementation of the method. The = 0; makes these methods pure virtual, so overriding them with a derived class is not optional but a must. This is what we want here, because if this method wasn’t overridden, it wouldn’t have any behavior.
Note that the destructor of an interface class almost always should be virtual, too.
LoopInOut
The logic under test. Note that it does not directly access the input/output hardware of the µC, but the m_hal variable which is an implementation of the Hal_IF interface at runtime. It is passed into the class by reference (marked by the & at the type declaration) upon object construction2.
// loopInToOut.h

class LoopInToOut
{
public:
    LoopInToOut(hardwareAbstraction::Hal_IF& hal): m_hal(hal){};
    ~LoopInToOut() = default;

    bool loopThrough(uint8_t inPin, uint8_t outPin);

private:
    hardwareAbstraction::Hal_IF& m_hal;
};
This is enabling the real magic of gMock: as the client code works with an interface, I can hand over the “real” implementation (of the hardware access) at chip runtime, but for the test I can hand over a “mock” implementation which I have control over at the time the test is running.
// loopInToOut.cpp

bool LoopInToOut::loopThrough(uint8_t inPin, uint8_t outPin)
{
    bool input = m_hal.digitalRead(inPin);

    m_hal.digitalWrite(outPin, input);
    return input;
}
loopThrough() again is really simple. It reads the input pin’s state and maps it to the output pin. It returns the input pin state to the caller.
Mock Hal
GoogleTest uses macros to define behavior. The mock class is also deriving from the interface and just provides declarations of the interface method it overrides. There’s no behavior involved just yet.
// hal_mock.h

class Hal_mock : public hardwareAbstraction::Hal_IF
{
public:
    MOCK_METHOD(bool, digitalRead, (uint8_t pinId), (const, override));
    MOCK_METHOD(void, digitalWrite, (uint8_t pinId, bool value), (const, override));
};
The test fixture
The test fixture contains common data and behavior for all test cases within a test suite. Test suite name = class name, and this exact name has to be reused in the tests that should belong to this suite.
// unittest_loopInToOut.cpp
class loopInToOut_Test : public ::testing::Test
{
protected:
    virtual void SetUp()
    {
        m_loopInToOut = new LoopInToOut(hal_mock);
    }

    virtual void TearDown()
    {
        delete m_loopInToOut;
    }

    NiceMock<Hal_mock> hal_mock{};
    LoopInToOut* m_loopInToOut{nullptr};
};
Thus, every test has some data prepared it can use: the class under test is set up as a pointer with a mocked implementation of its dependency.
The actual test
The test is defined by the TEST_F macro meaning “test with fixture” that expects test suite and test names.
The ON_CALL macro is a command to gMock providing behavior to the mocked class how to behave when digitalRead(_) is called with any input (underscore = any): It shall return true by default.
// unittest_loopInToOut.cpp

TEST_F(loopInToOut_Test, loop_inputHigh_writesCorrectOutputHigh)
{
    ON_CALL(hal_mock, digitalRead(_)).WillByDefault(Return(true));

    EXPECT_CALL(hal_mock, digitalWrite(2, true));

    m_loopInToOut->loopThrough(1, 2);
}
Then there’s an expectation expressed on the mocked class, stating that digitalWrite is called with input values of (2, true) which are also checked for correctness.
The last statement actually calls the implementation so that the expecations can be verified.
Hardware behavior implementation
As main.cpp accesses the hardware, there has to be some kind of interface implementation for this.
// hal.h
class Hal : public Hal_IF
{
public:
    Hal() = default;
    ~Hal() = default;

    bool digitalRead(uint8_t pinId) const override;
    void digitalWrite(uint8_t pinId, bool value) const override;
};
The header states that Hal derives from Hal_IF and overrides both of its methods.
// hal.cpp
#include "Arduino.h"

#include "hal.h"

namespace hardwareAbstraction{

bool Hal::digitalRead(uint8_t pinId) const
{
    return digitalRead(pinId);
}

void Hal::digitalWrite(uint8_t pinId, bool value) const
{
    digitalWrite(pinId, value);
}
Note that only the source file actually includes the Arduino.h to access the hardware. So the dependency to hardware functions is very limited and buried in interface implementations that can be selected by the program’s structure. While main.cpp will want to create an object of the above implementation, the test will want to instead hand over a mock.
Gtest key concepts
Google’s official github page on GoogleTest will help you a lot, not only for getting started3. The gmock Cookbook is an excellent guide that I have been using over the months as my tests became more complex hard to write, and the gmock Cheat Sheet will help you when you lost track of how to write a test for this and that special problem.
Dependency Injection
Dependency Injection is the basic mechanics you need to understand to make gMock work. Let me draw an image for you to make it more apparent: 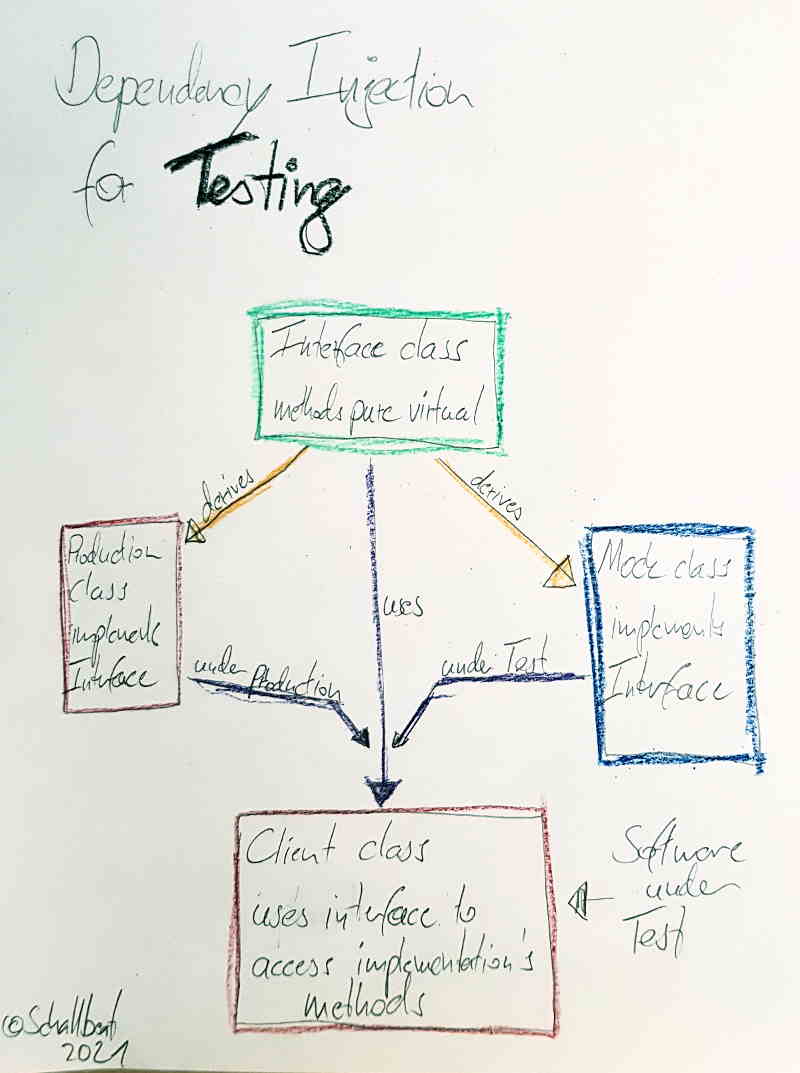 The important concept is, that the interface is merely a placeholder for the implementation of the client classes’ dependency. At runtime, e.g. when the host creates the client object, it will handover (i.e. inject) the implementation of the dependency into the client which then can call any of its methods, as their signatures are known at compile time due to the interface that the client is using.
- The mock now merely is an implementation of the interface specialized for testing.
- The production implementation is used in all other contexts, it features the “real” behavior of that class.
Hardware Abstraction Layer
Yep, well, this might be one of the tricky bits when working with embedded software. At some point, it boils down to outside world interaction, be it with General Purpose Input Output (GPIO) pins, accessing one of the myriad of hardware bus systems like I2C, UART, SPI, CAN to control external hardware, or simply to use system internals like the EEPROM - that’s where the trouble begins.
Gtest runs on GCC/G++ compiler which just doesn’t know anything what the specialized compiler of that particular chip knows. It wouldn’t even understand the header files. Now, there are two options around this issue:
- Write fake headers for each µC-specific thing that can be used by GCC/G++
- Cut! At! The! Interface! to any µC-specific thing using an (Hardware) Abstraction Layer so your production environment uses the chip hardware as it normally does, but the test environment uses mocks instead.
There are quite some advantages for the second approach:
- It’s clean. It will force you to not cross abstraction layers which should not be crossed.
- It’s easy. You can test your business logic without even programming your µC! Just mock the inputs and intercept the outputs, write some tests and run them in the terminal.
- It’s portable. Exchange the implementation of your abstraction layer, and you’re almost ready to execute on a different controller family or even on another manufacturer’s chips.
Drawbacks
Hmm, there must be some shadow somewhere. Right you are. In my opinion, these are the main disadvantages when getting everything ready to be tested without hardware attached:
- Memory. Both ROM and RAM will be cluttered more easily when you have a massive amount of classes and vtables flying around.
- Ownership. Injecting dependencies separates ownership from useage of an object, and you need to make up your mind how to organize both.
- 3rd party libaries. You’ll have to create an interface header, an adapter implementation, and a mock for each library that uses “chip-internals”.
- Complexity. As your objects are injected via an interface, you’ll have to use call-by-reference or hand over by pointer 😨 now. The former is additionally limited because it will only work for constructor injection, not for any other kind (method injection, setter injection, etc.)
Some more tips
- Keep everything “behind” your abstraction layer as simple as possible: You can only test and debug this stuff on target. Example: each method only executes one command (as in my example code).
- Create a loader class or a Dependency Injection Container (Nicolas Croad) that holds all objects to be injected and can spit them out on request.
- Make up your mind about the drawbacks mentioned above and how you create your low-level Architecture to accomodate for this.
- Don’t hesitate to create more than one level of interfaces. It might be a good idea to use this pattern not only for the direct hardware interaction, but also in between software modules, which then can be tested in a higher granularity so your overall progress might even be quicker versus one big ball of classes you can just control via mocks in the Hardware Abstraction Layer.
Tough Stuff!
You earn a break now. This was much information to deal with. Take your time. Contact me on this topic’s discussions page if you feel something is missing, incorrect, to be improved, or just exactly what you needed right now.
Schallbert
-
Installation under Linux is actually more easy, as
gccandg++come already pre-installed. So even if they do not feature the correct packages yet to support GoogleTest, their error message will be of much better help than the ones you get on Windows when some libraries are missing… 🙃 ↩ -
This is also called Constructor Injection, a subtype of Dependency Injection which is a means to achieve Inversion Of Control. I have prepared some links for you to continue reading, it is a rich topic that whole books have been written about.` ↩
-
By The way: the googletest site is also static like mine and it uses Jekyll as well 👋 …do you like it? I’d like to see your opinion on my discussions page ↩