Klingenbutler
Why Klingenbutler?
After I had solved the problem of the lack of a shelf for solid shampoos in my shower - the result was the Seifenbutler - I noticed razors flying around there more and more as a nuisance.
If they lie on the edge of the shower, a puddle forms around them. This creates a lot of limescale stains and makes cleaning more difficult. If you put them on the fittings, they will fall down sooner or later and get damaged. The same applies to the wobbly shelf on the edge of the shower cubicle.
It makes sense to reuse the Seifenbutler’s clamping mechanism. This means that only the “front part” needs to be redesigned and I have a stylish shower tray for razors - the Klingenbutler.
The design
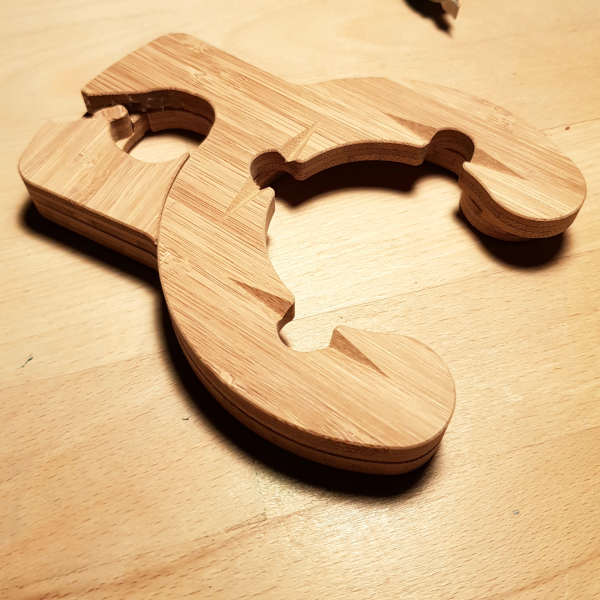
I like the round shape of Seifenbutler and want to design Klingenbutler in a similar way. However, the razors should not be touched too easily by accident. So I decide to attach them as “inside” as possible. To do this, I create a ring with an opening, which in turn has three notches for razors. I design the radii of the notches so that all the wet razors I have available fit in there and even toothbrushes can be hung on the Klingenbutler without the bristles touching.
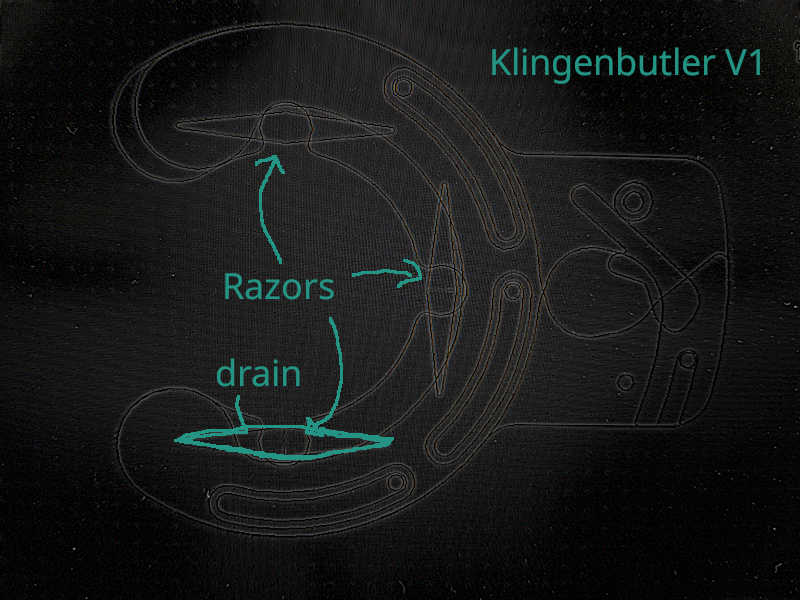
I design the opening (in the drawing on the left) for upper and lower shells so that the upper shell always covers the lower shell in all possible closed positions. This avoids protruding edges with particularly large or small shower rod diameters.
Snapping the razors into place
It was more difficult to plan snap-in aids so that the razors cannot come loose on their own. In the first draft, I decided on a notch in the shape of a double tetrahedron. In the picture above, the notch is labeled “drain”. It has a gradient of 3mm over a length of approx. 15mm, allows splash water to run off and enables the razors to dry quickly.
G2 curves
 When I showed one of my designs to a friend of mine shortly before starting production - he is a 3D designer by profession - he immediately noticed that I had not planned for a smooth transition between curve radii. He said that in such cases “G2 curves” are used in CAD and that the model would have much more harmonious transitions.
In technical jargon, this seems to be referred to as geometric continuity. I immediately asked the software company behind my CAD tool whether they supported something like this and lo and behold - there is the tool Create tangent continuous connection. From now on I will use this tool when I connect radii.
The tool creates a Bezier curve whose endpoints are tangentially connected to the two circle segments and thus eliminate the kink.
 In addition to the more pleasing appearance, this approach also has an advantage in production: When traveling along bends, the CNC machine has to make sudden changes in direction, similar to connected line segments that meet at an angle. This means that it has to slow down and accelerate at the new curve radius. By using tangent-continuous connections, however, acceleration peaks are significantly reduced and the machine runs at a more consistent speed.
If you have projects with lots of “bends” in the drawing, like with the Klingenbutler, you can quickly add up to a few seconds of production time per part, which can easily be saved - perhaps more on this later.
First prototype - version 1.0
I started production with my “classic” prototype material: cast PMMA (acrylic glass) with a thickness of 5mm in opaque white. If you use reasonably suitable parameters, the material behaves extremely well. At the same time, it mercilessly reveals all errors: here a bevel a little too wide, there slight chatter marks caused by the machine accelerating out of a corner, chips caught in the bottom of threads - all of this is clearly evident in the slightly translucent material composition and strong reflections on the material edges.
This material is therefore ideally suited to improving the design and production of products.
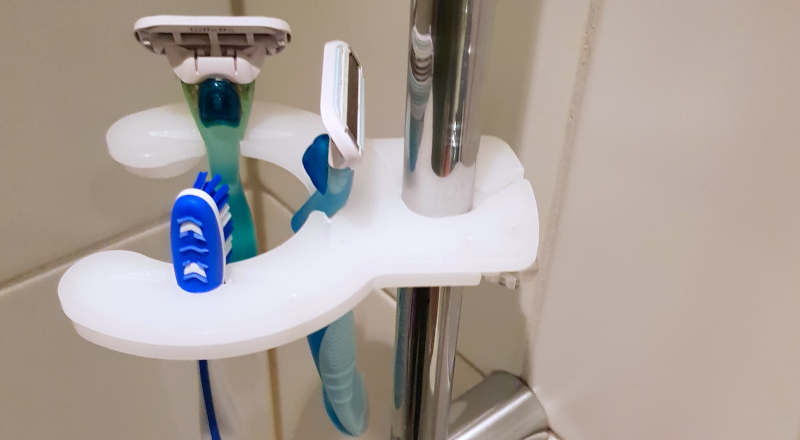
Thanks to my experience with Seifenbutler, holding it down during production and assembly of Klingenbutler went smoothly. From now on, toothbrushes and razors can be found in a fixed place in our shower 🙂.
Version 1.1 - Production in bamboo
 I actually want to get away from plastic. Over the course of the year I have already switched the production of my Seifenbutlers to “greencast” acrylic glass - i.e. PMMA, which itself is made from 100% recycled material - but it would be even better not to use any plastic at all.
For this I had a few samples of “Moso bamboo” sent to me: stick glued wood cross-glued in three layers, similar to plywood, just under 7.5mm thick. For production in bamboo, I made the fitting tolerances a little more generous (0.1mm undersize) and simply converted metric threads in the plan into simple holes for wood screws.
Omitting unnecessary things
When assembling the first prototype, it became clear to me that the third bayonet had become superfluous. Together with a few other smaller changes, I developed version 1.1:
- Omitting the third screw connection in the locking circle
- Locking lugs/drain channel: Continuous engraving without stopping at “keyhole”
- Bayonet: Chamfering the insides on the back and thus breaking through the surface
Speed and feed
For full groove milling, I use a DLC-coated (diamond-like-carbon) 4mm two-tooth milling cutter without twist with 12mm cutting length. I operate it at S30000rpm with a feed of F3000mm/min. I go into the full material depth with Z+ 7.5mm and drill holes and material ramps at 20°.
I make bevels using a 90° engraving cutter, three-edged, diameter 10mm. I operate it at F5000mm/min at S15000rpm and a center distance of 2mm, which for a smooth edge with a width of 0.5mm already means that it needs 2.5mm of space “downwards” in the Z direction.
For holes, pockets and small recesses I use a relief-ground 2mm two-cutter fishtail with 15° twist and 20mm cutting length. I operate it at a cautious 1700mm/min at S30000rpm and a depth of only Z+1.5mm. Here, too, I dive into the material at 20°.
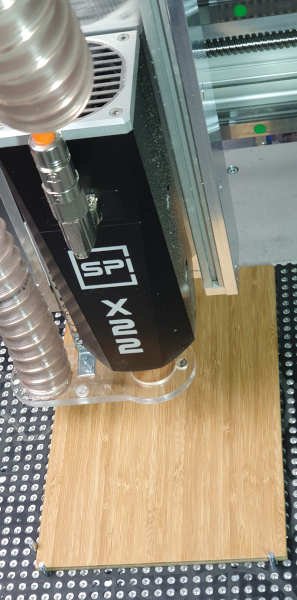
Production
Working with the material “bamboo”, which was completely unknown to me until then, was surprisingly easy. Thanks to my new and very sharp cutters, there were no tears to complain about and the material itself also had hardly any defects or damage.
Making of Klingenbutler
During processing, quite fine chips were created, which are a bit reminiscent of dust from processing MDF boards. I am not yet sure whether I should reduce the speed or whether this is due to the straight cutting edges of the cutter. When milling full slot, the cutter may have to carry chips with it for several revolutions before it can leave them behind.
In any case, drilling with this cutter and unchanged parameters is not recommended. All of the drill holes have charred edges, which suggests that the speed was far too high. I also drilled in one piece instead of retracting the cutter several times. Let’s use the rule of three to make this obvious: At a feed rate of FZ+2000mm/min, S30000/rpm and Z7.5mm, the cutter makes 112.5 revolutions in the drill hole, so the cutting edges rub senselessly along the wall of the drill hole 225 times - only the center cutting edge at the bottom removes material. In addition, the chips are not ejected but are carried along the whole time.
For the next prototype, I will either make drill holes with retractions and a drastically reduced speed or simply use a smaller cutter.
Result
 This is impressive. I took the bevel for edge breaking from the production in acrylic glass. It is very narrow at
 0.5mm. Nevertheless, the detail is really clean. The upper and lower shells of Klingenbutler can be smoothly moved against each other and the clamp, my problem child from this video, could also be milled without tearing.
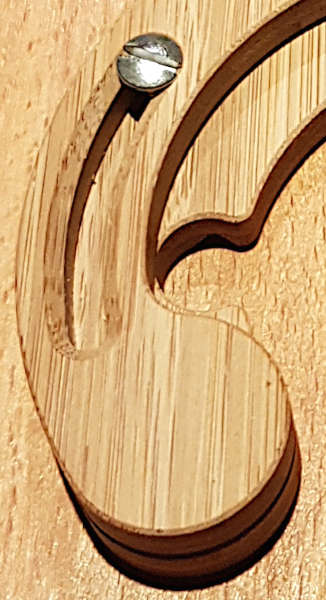
Assembly is problem-free and the wood screws can also be easily screwed into the pre-drilled holes. The bamboo Klingenbutler variant holds on to the shower rail even better than its acrylic glass counterpart - thanks to the rougher surface and greater material thickness.
It remains to be seen whether the material is durable enough in damp rooms. It is still popular for cutting boards in the kitchen, so I guess it will be just fine.
Outlook
The use of bamboo has left me very motivated: a great material. Hard and strong but light, easy to machine, dimensionally stable and hardly any material defects: that’s how you want to work with natural materials!
This prototype is now in our shower for endurance testing. In the meantime, I’ll continue to refine the design.
Version 1.2
I have the following small improvements planned for V1.2:
- Drilling: Choose a smaller cutter (at the expense of the cycle time)
- Fastening: Mill a cutout so that the knurled wheel no longer protrudes
- Remove superfluous recess on the inside of the upper shell
- Allow different radii to be merged with G2 curves
- Replace locking lugs with a more harmonious, round drainage channel
- Align the grain: Manufacture all parts “vertically”
- Mill the clamps in the first setup and make them
0.04mmthicker
Here too, the aim is to achieve a good product through continuous improvement.